
Dec 5, 2025
Learn how to safely and easily change light bulbs in recessed lighting with our straightforward guide. Read on for step-by-step instructions!

Key Takeaways
Always turn off power at the circuit breaker and allow bulbs to cool for 15-20 minutes before replacement
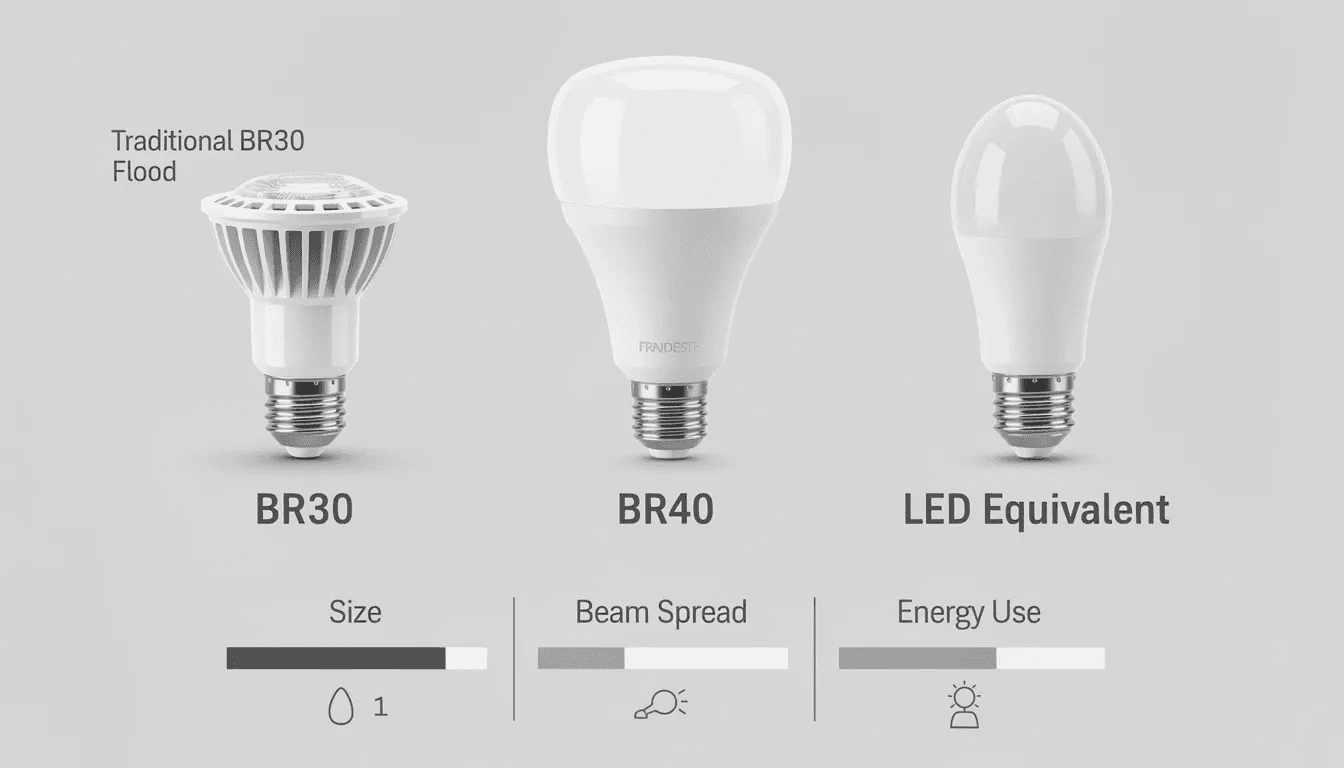
Most recessed lights use BR30 bulbs for 4-inch fixtures or BR40 bulbs for 6-inch fixtures
Remove trim by gently pulling down or squeezing spring clips to access the bulb socket
Test the new bulb immediately after installation to ensure proper connection
The entire process typically takes 10-15 minutes with proper safety precautions
Staring up at a burned-out recessed light can feel intimidating, especially when you’re unsure how to safely access the bulb without damaging your ceiling or risking electrical shock. The good news is that learning how to change light bulb in recessed lighting is simpler than most homeowners realize, provided you follow proper safety protocols and understand your specific fixture type.
Recessed lighting fixtures are designed for relatively easy bulb replacement, but the process differs significantly from changing a standard table lamp or overhead light fixture. The key lies in understanding your specific recessed lights, taking appropriate safety measures, and following a systematic approach that protects both you and your electrical system.
In this comprehensive guide, we’ll walk you through every step of the process, from essential safety preparations to troubleshooting common issues. Whether you’re dealing with spring clip mechanisms or twist-lock sockets, halogen bulbs or LED replacements, you’ll have the confidence to tackle this routine maintenance task safely and efficiently.
Safety Preparations
Before you even think about touching that light fixture, proper safety preparations can mean the difference between a successful bulb change and a dangerous electrical incident. Working with recessed lighting fixtures involves electrical components and often requires working at height, making safety your top priority.
Step-by-Step Safety Checklist
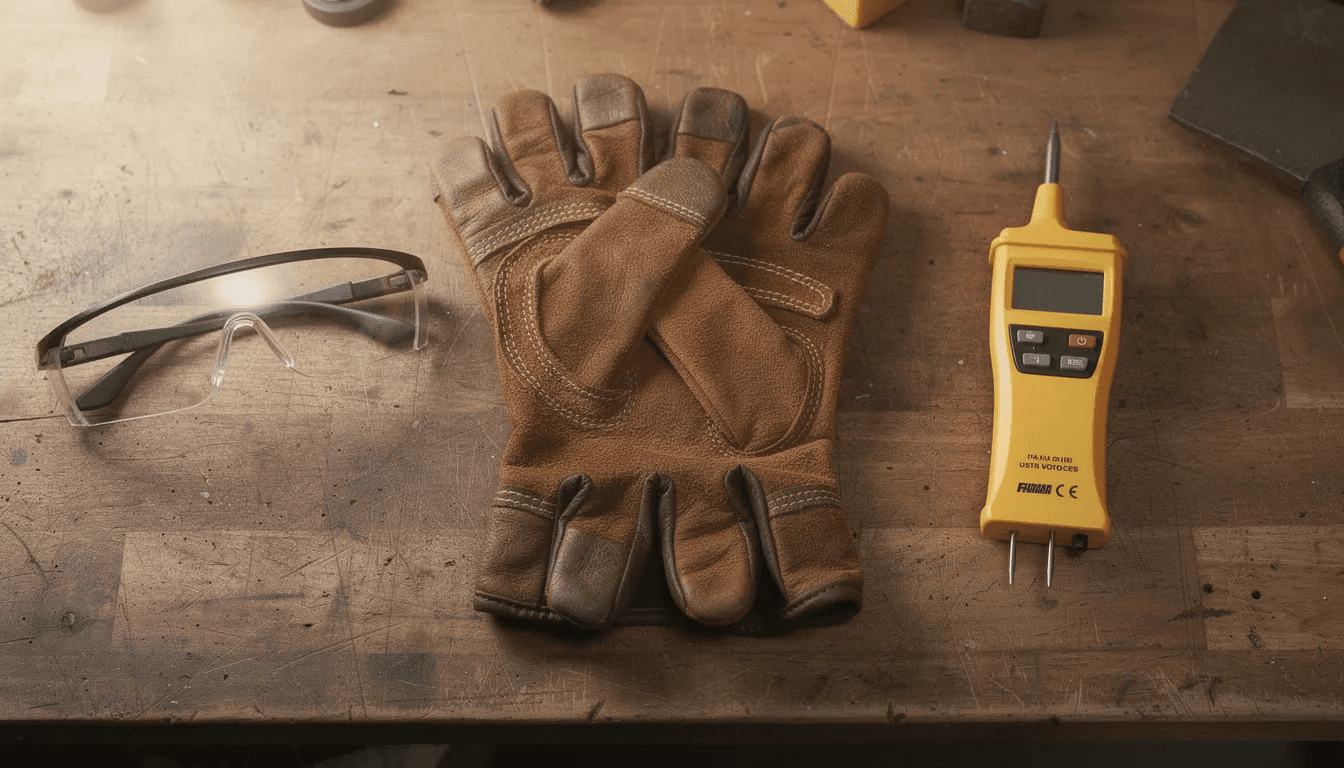
Start by gathering your essential tools: a sturdy ladder or step stool, work gloves, safety glasses, and a non-contact voltage tester. These items form the foundation of safe recessed light maintenance and should never be skipped, even for what seems like a quick bulb swap.
Your first action should always be to turn off the power at the circuit breaker, not just the wall switch. Wall switches can fail or be wired incorrectly, but shutting off power at the source eliminates any possibility of electrical shock. Locate the correct circuit breaker by testing the light switch before and after shutting off each breaker until the light no longer responds.
Cooling Time Requirements
After turning off the power, allow 15-20 minutes for the old bulb to cool completely. Halogen bulbs and incandescent replacement bulbs generate significant heat during operation, reaching temperatures that can cause serious burns. This cooling period is particularly crucial if the light was recently on, as the entire fixture and surrounding housing can retain heat well after the power is shut off.
Use this waiting time productively by gathering your replacement bulb and double-checking that it matches your fixture specifications. Avoid touching halogen bulbs with bare hands during this process, as skin oils can cause hot spots that lead to premature bulb failure.
When to Call an Electrician
Certain situations warrant professional help rather than DIY replacement. If you notice any signs of electrical damage, such as blackened areas around the socket, melted plastic components, or a burning smell, stop immediately and contact a qualified electrician. Similarly, if the entire fixture appears loose or the housing seems to be pulling away from the ceiling, professional assessment is essential.
Water damage or corrosion around the fixture also indicates potential wiring problems that require expert attention. Remember, the cost of professional electrical work is far less than the potential consequences of electrical fire or personal injury.
Identifying Your Recessed Light Type
Understanding your specific recessed lighting fixtures is crucial for selecting the correct replacement bulb and using the proper removal technique. Most recessed lights fall into standard categories, but variations exist that can impact your approach to bulb replacement.
Fixture Size Specifications
Recessed lighting fixtures are typically measured by their trim diameter, with 4-inch, 5-inch, and 6-inch being the most common residential sizes. The fixture size directly correlates to the bulb type you’ll need: 4-inch recessed cans typically use BR30 bulbs, while 6-inch fixtures accommodate BR40 bulbs. The “BR” designation stands for “bulged reflector,” referring to the bulb’s shape that maximizes light distribution in recessed applications.
You can measure your fixture by looking at the trim ring diameter, or check for manufacturer labels inside the housing that specify both size and maximum wattage. Many recessed lighting fixtures manufactured before LED adoption have 65-watt maximum limits, which becomes important when selecting replacement bulbs.
Spring Clips vs. Twist-Lock Mechanisms
The bulb removal method depends on your fixture’s socket design. Spring clip systems are the most common in modern recessed lights, where small metal clips hold the bulb in place. These clips must be squeezed together while pulling the bulb straight down to release it from the socket.
Twist-lock mechanisms use a quarter-turn system where the bulb locks into place with a clockwise rotation and releases with counterclockwise movement. You’ll recognize this type by the small tabs on the bulb base that align with slots in the socket. Some older fixtures use standard screw-in sockets similar to regular light bulbs, though these are less common in recessed applications.
LED Compatibility Considerations
When replacing older halogen or incandescent recessed light bulbs with LED alternatives, verify compatibility with your existing dimmer switches. Many older dimmers aren’t designed for LED loads and can cause flickering, buzzing, or premature LED failure. LED bulbs also generate significantly less heat, which can be beneficial for fixture longevity but may require different ventilation considerations in some housing designs.
Removing the Old Bulb
With safety preparations complete and your fixture type identified, you can begin the actual bulb removal process. The key to successful removal lies in understanding that most recessed lights require trim removal before you can access the bulb itself.
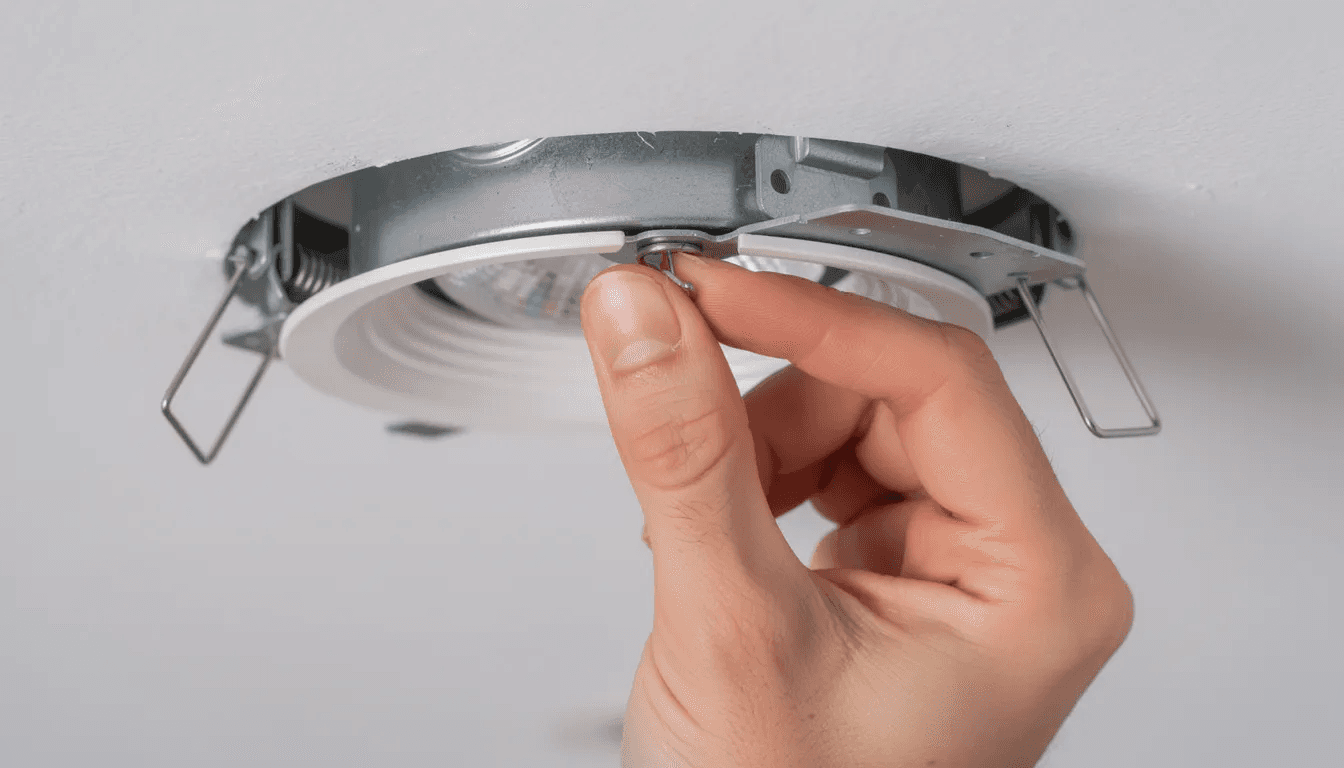
Trim Removal Techniques
The decorative trim ring that sits flush with your ceiling isn’t just aesthetic—it often holds the bulb mechanism in place. For spring-loaded trim systems, grasp the trim firmly and pull straight down with steady pressure. The spring clips will compress, allowing the trim to lower and expose the bulb socket above.
Some trim designs feature visible spring clips around the perimeter. In these cases, you can gently squeeze the clips while pulling to make removal easier and reduce stress on the mounting system. If the trim feels stuck, check for paint or debris around the edges that might be creating resistance.
Twist-lock trim systems require a slight counterclockwise rotation while pulling down. You’ll feel the trim release as the locking mechanism disengages. Avoid forcing any trim removal, as excessive pressure can damage the ceiling material or the fixture mounting.
Bulb Extraction Methods
Once you have access to the bulb socket, the removal method depends on your specific mechanism type. For spring clip bulbs, locate the small metal clips on opposite sides of the bulb base. Squeeze these clips together firmly while pulling the bulb straight down and out of the socket. The key is applying even pressure to both clips simultaneously to avoid binding.
Twist-lock bulbs require a quarter-turn counterclockwise rotation to align the bulb tabs with the socket release position. You should feel the bulb drop slightly when properly aligned, indicating it’s ready for removal. Pull straight down once the locking mechanism is disengaged.
Handling Broken or Stuck Bulbs
If the old bulb breaks during removal, turn off the power immediately and allow extra cooling time before proceeding. Use needle nose pliers or long nose pliers to grip any remaining glass or metal base components. For stubborn socket material, a small amount of penetrating oil can help loosen corrosion, but ensure the fixture is completely dry before restoring power.
In cases where the entire bulb socket appears damaged or the broken bulb has caused electrical damage, stop the replacement process and consult an electrician. Attempting to force removal of damaged components can create safety hazards and potentially damage the whole fixture.
Installing the New Bulb
Proper installation of your new recessed light bulb ensures reliable operation and prevents premature failure. The installation process reverses the removal steps but requires attention to specific alignment and pressure techniques.
Bulb Selection and Specification Matching
Before installation begins, verify that your replacement bulb matches all fixture requirements. Check the wattage rating, bulb type (BR30, BR40, etc.), and base type against your fixture specifications. LED bulbs often provide equivalent light output at lower wattages, but ensure the physical dimensions match your recessed can size.
For halogen replacement bulbs, handle them with clean gloves or a cloth to avoid transferring skin oils to the glass surface. These oils create hot spots that can cause the bulb to fail prematurely or even break during operation.
Spring Clip Installation Technique
Installing spring clip bulbs requires precise alignment and controlled pressure. Position the new bulb so the spring clips align with the corresponding slots in the socket. Compress the clips together and push the bulb up into the socket until you feel it seat properly. The clips should snap into place with an audible click when properly installed.
Test the security of the installation by gently tugging on the bulb. A properly installed spring clip bulb should feel firmly seated with no downward movement. If the bulb feels loose or the clips don’t seem to be holding properly, remove and reinstall, checking for proper clip alignment.
Twist-Lock Installation Process
Twist-lock bulbs require careful alignment before the locking rotation. Hold the bulb with the tabs aligned to the socket openings and push straight up until the bulb is fully seated in the socket. Then rotate clockwise approximately one-quarter turn until you feel the bulb lock into position.
The rotation should feel smooth and controlled. If you encounter resistance during the twist, pull the bulb down slightly and realign before attempting the rotation again. Forcing the rotation can damage either the bulb base or the socket mechanism.
Trim Reinstallation
Once the new bulb is securely installed, replacing the trim completes the installation process. For spring-loaded trim, align the trim with the ceiling opening and push up until the springs compress and the trim sits flush against the ceiling. The trim should lay flat without gaps or uneven spacing around the perimeter.
Some trim rings require a slight twist to lock into place. You’ll know the trim is properly seated when it sits evenly against the ceiling surface and doesn’t move when lightly touched. If the trim won’t stay in place, double-check that the bulb is properly seated and not interfering with the trim mechanism.
Testing and Finishing
The testing phase confirms that your installation was successful and identifies any issues before you consider the job complete. Proper testing also ensures that the recessed lighting fixture will operate safely and reliably.
Power Restoration Process
Return to your circuit breaker and restore power to the light circuit. Use your non-contact voltage tester to confirm that power is flowing to the circuit before testing the actual light switch. This verification step ensures that your circuit breaker is functioning properly and that power is reaching the fixture.
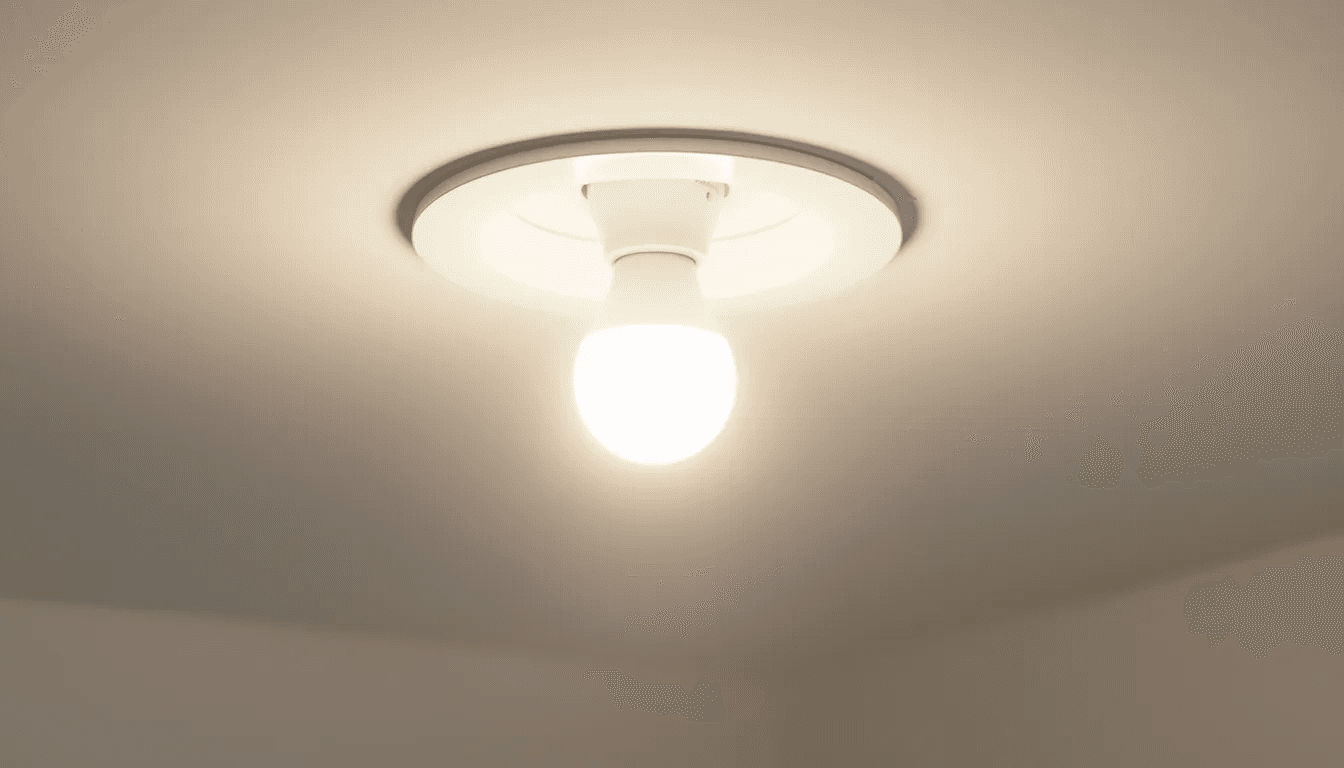
Approach the light switch and turn it on slowly, watching for any sparking, unusual sounds, or immediate flickering. A properly installed bulb should illuminate immediately with steady, even light output. If you’re installing dimmable LED bulbs, test the dimmer function across its full range to ensure compatibility.
Function and Performance Testing
With the light operating normally, check for proper trim alignment and secure fit. The trim ring should sit flush against the ceiling without any visible gaps or tilting. Gently tap the trim to ensure it’s securely mounted and won’t fall due to vibration or settling.
Test the light switch multiple times to verify consistent on/off operation. Pay attention to any delay in illumination, which might indicate compatibility issues between LED bulbs and older dimmer switches. The light output should be even across the beam pattern without dark spots or unusual shadows.
Final Safety Verification
Allow the new bulb to operate for 10-15 minutes while you clean up your work area and dispose of the old bulb properly. This burn-in period helps identify any immediate installation problems and confirms that the bulb is operating within normal temperature ranges.
Check that all tools and materials are cleared from the work area and that your ladder or step stool is stored safely. Proper cleanup prevents accidents and ensures that your workspace is ready for future maintenance tasks.
Troubleshooting Common Issues
Even with careful installation, you might encounter issues that require additional attention. Understanding common problems and their solutions helps you address these challenges quickly and safely.
New Bulb Won’t Illuminate
If your new bulb fails to turn on after installation, start by verifying that the circuit breaker is on and the wall switch is functioning. Use a non-contact voltage tester to confirm power is reaching the fixture. Sometimes circuit breakers can trip during installation, especially if there was momentary contact between wires.
Check the bulb installation by removing and reinstalling it, paying particular attention to proper seating in the socket. Spring clips must be fully engaged, and twist-lock bulbs need complete rotation to make proper electrical contact. If the socket appears corroded or damaged, the entire fixture may need professional attention.
LED compatibility issues with older dimmer switches can also prevent proper operation. Try installing the LED bulb with the dimmer switch at full brightness, as some LED bulbs won’t illuminate at low dimmer settings. If the bulb works at full brightness but not when dimmed, you may need a compatible LED dimmer switch.
Loose or Falling Trim
Trim that won’t stay in place usually indicates problems with the spring mechanism or improper bulb installation. Remove the trim and inspect the spring clips for damage, corrosion, or loss of tension. Springs that have lost their tension won’t hold the trim securely against the ceiling.
Check that the bulb isn’t protruding too far from the socket, which can interfere with trim installation. Some LED bulbs have larger heat sinks that can affect trim fit. If the bulb appears to be the correct size but still interferes with trim installation, you may need a low-profile LED alternative.
In some cases, the housing itself may have shifted within the ceiling cavity. This requires accessing the space above the ceiling to check mounting and may necessitate professional repair to ensure proper fixture support.
Premature Bulb Failure
Recessed light bulbs that burn out quickly often indicate heat buildup issues within the fixture. Check that the housing has adequate ventilation and that insulation isn’t packed tightly around the fixture. Most recessed lights require several inches of clearance for proper heat dissipation.
Voltage fluctuations can also cause premature LED failure. If multiple bulbs in your home are failing quickly, have an electrician check your electrical system for voltage stability issues. LED bulbs are particularly sensitive to voltage variations and may require power conditioning in some installations.
Avoid touching halogen bulbs with bare hands, as skin oils create hot spots that lead to early failure. Even after installation, fingerprints on the glass surface can cause problems, so clean halogen bulbs with alcohol and a lint-free cloth if contamination occurs.
LED Dimming Problems
LED bulbs and older dimmer switches often have compatibility issues that manifest as flickering, buzzing, or limited dimming range. The solution usually involves upgrading to an LED-compatible dimmer switch designed for the lower power consumption of LED lighting.
Some LED bulbs work better with trailing-edge dimmers rather than traditional leading-edge dimmers. Check the bulb manufacturer’s recommendations for compatible dimmer types, and consider testing different LED brands if compatibility issues persist.
In installations with multiple LED bulbs on one dimmer circuit, ensure that the total LED wattage exceeds the dimmer’s minimum load requirement. Some dimmers need a minimum load to function properly, and LED bulbs may not provide sufficient load for normal operation.
FAQ
Can I use any LED bulb in my recessed light fixture?
Not all LED bulbs are suitable for recessed lighting fixtures. You must match the bulb type (BR30 for 4-inch fixtures, BR40 for 6-inch fixtures), ensure the wattage doesn’t exceed your fixture’s maximum rating, and verify compatibility with any existing dimmer switches. Additionally, check that the LED bulb’s heat sink design doesn’t interfere with your fixture’s trim installation.
How often should recessed light bulbs be replaced?
LED recessed light bulbs can last 15,000-25,000 hours under normal conditions, while halogen bulbs typically last 2,000-4,000 hours. The frequency of replacement depends on daily usage, but most homeowners can expect LED bulbs to last 10-15 years with average use. Replace bulbs immediately when they fail to prevent stress on the electrical system and maintain consistent lighting levels.
Why does my recessed light bulb keep burning out quickly?
Rapid bulb failure usually indicates heat buildup due to inadequate ventilation, excessive insulation around the fixture, or voltage fluctuations in your electrical system. Check that your fixture has proper clearance from insulation and that you’re not exceeding the maximum wattage rating. Frequent on/off cycling and incompatible dimmer switches can also reduce bulb lifespan significantly.
Is it normal for the trim to be loose after changing the bulb?
Loose trim after bulb replacement typically indicates that the spring clips have lost tension, the bulb isn’t properly seated, or the bulb size is interfering with the trim mechanism. The trim should sit flush against the ceiling and feel secure when properly installed. If the trim continues to fall or feels loose, inspect the spring mechanism and consider replacing the trim assembly.
Can I replace a halogen recessed bulb with LED without changing the fixture?
In most cases, you can directly replace halogen recessed light bulbs with LED equivalents without changing the entire fixture. However, verify that your existing dimmer switches are LED-compatible, as older dimmers may cause flickering or buzzing with LED bulbs. Also ensure the LED bulb’s physical dimensions match your fixture requirements and that the heat sink design doesn’t interfere with trim installation.
Safety first, hassle never. Get transparent next steps and a service time that works. Call (949) 997-3555 to book your Orange County electrician now.
Contact
Get in Touch
Schedule your transformer installation today!
Reach out for inquiries or quotes anytime.
info@ocelectricians.com
Live chat
We're here to assist you instantly.
Start chat now
Phone
Call us for immediate assistance.
+1 (949) 997-3555
Office
Visit us for consultations and services.
18650 MacArthur Blvd., Irvine, CA 92612